This howto is intended to help people who currently use a wireless router in their house, and also have additional PCs or devices without wifi cards which cannot be connected to the wireless router using a cable because they're too far from it (like in another room).
This howto will explain how to use the wrt54g a to connect these remote PCs to the internet and your home network, without using wifi cards. This is possible using 3rd party firmware (sveasoft) which allows the wrt54g to operate in "client" mode, where it forwards packets from its connected devices to the main wireless router, using a wireless link.
I got my wrt54g running in client mode - that is, it serves as a bridge between a PC attached to it and the main wireless router. Here's my complete setup, starting with the wired connections (markeded by "<===>"):
Room 1: Cable Modem <===> D-Link DI-624 Wireless Router <===> PC-1
Room 2: WRT54G <===> PC-2
The DI-624 and the WRT54G connect to each other wirelessly. I also have a mobile laptop which connects wirelessly to the DI-624.
So in this case, the WRT54G let me use PC-2 without having a wifi card in that PC. In fact, I could connect up to 4 PCs to the wrt54g, and save the price of 4 wifi-54g pci cards, plus I don't have to install drivers for wifi cards (a pain in Linux). The wrt54g acts like a "wireless ethernet bridge", which in fact is another product sold by linksys (WET54G) for around $150. This is also useful when you have devices (in a room which doesn't have ethernet connections) which can only connect using a ethernet cable, but cannot connect wirelessly - like XBOX !
So how do you do it ? Here's the list of steps - you should be doing these steps (except step 1) from a PC attached to the wrt54g (e.g. PC-2 in my setup). Physically attaching a PC to the wrt54g is required only for this initial set up phase, because we need to login and set up the various options. Note that this doesn't require any changes to your main router's configuration, so it's quite safe with regard to not messing up your current networks' setup.
1. Download the "wrt54g alchemy firmware" (google this, or go here) version 6rc5 from the internet (it is the only one compatible with the new models wrt54g V2.2 & wrt54gs V1.1).
2. Upload the firmware to the wrt54g via the "Administration->Firmware Upgrade" option in the router's web interface.
3. Reset the device (press reset button until power led flashes - this could take 20 seconds or more). In the following steps, leave all settings which are not mentioned in the description at their default (only change the ones specifically mentioned in the step).
Note: We will use addresses that end in 128-255 for the wrt54g router and it's attached PCs. To make sure there is no overlap in the addresses assigned by the two routers, we have to make sure that your main router only assign addresses below 128 to its own clients. For example, if your main router address is 192.168.0.1, its DHCP address range could be 192.168.0.50 - 192.168.0.120. Another important note regarding the main router: some routers allow you to disable the broadcast of the SSID, but for this setup to work properly the SSID broadcast MUST BE ENABLED (which is usually the default behavior).
4a. In "Setup::Basic setup" screen, set Internet Connection Type to "Auotomatic Configuration - DHCP".
4b. Set the local IP to 192.168.0.129, assuming your main router is 192.168.0.x (in general, if your main router is a.b.c.d set the wrt54g to a.b.c.129).
4c. Set the Subnet Mask to 255.255.255.128.
4d. Set the "Gateway" to the IP address of your main router (e.g. 192.168.0.1).
4e. Set the DHCP Server to Enabled, and starting IP Address to something above 129 (e.g. 140).
4f. Save the settings on this page. You should reboot the attached PC, since the subnet mask has changed. Note: from now on you have to use the new local IP you set in step 4b (e.g. http:// 192.168.0.129) to connect to the router from your PC.
5. In "Setup::Advanced Routing" screen, make sure operating mode is "Gateway".
6. In "Wireless::Basic Settings" screen, set Wireless mode to "Client", wireless network mode to "mixed", and SSID to your main wireless router's SSID.
7. In "Wireless::Security" screen, set yor WEP/WPA settings which match the main wireless router. You should now be connected to the main wireless router. Note: if you have MAC filtering set up on the main router (which allows only specific clients to connect), then obviously you have to add the client router to the list of allowed clients.
To verify that you've established a connection to the main router, you can check the "Status::Router" screen, which should show an IP Address assigned by the main router (which would end with a number below 128), and the "Status::Wireless" page should show the AP Signal strength together with the mac address of the main router. Also you should now be able to ping the main router and even log in to it (using h ttp://192.168.0.1) from the PC attached to the client router (the wrt54g).
8. In "Security::Firewall" screen, disable firewall protection, as this subnet is already behind your main router's firewall. Also make sure that "Block Anonymous Internet Requests" is unchecked.
9. In "Administration::Management" screen, you can leave all settings at their default. You may want to enable remote management and Telnet or SSHD, especially if you want to be able to log in to the wrt54g from a computer which is not directly attached to it.
10. To enable PCs attached to the main router to be able connect to PCs attached to the wrt54g: Login into the wrt54g using telnel or ssh by running the command "telnet 192.168.0.129" and use same root/passwd as for the web interface. Then type this command (copy it exactly):
# echo 1 > /proc/sys/net/ipv4/conf/`route | grep default | awk '{print $NF}'`/proxy_arp
Now you should be able to ping/telnet to any PC attached to the wrt54g from any PC attached to the main router. Btw, this assumes that the subnet mask of the main router is the default 255.255.255.0.
Important note about the last step : The last step (which is an optional step) allows PCs attached to the main router to be able to connect to PCs attached to the client router, by specyfing the IP of the destination PC, for example "telnet 192.168.0.150". But they are still on two different subnets which do not share their broadcast messages, therefore when browsing PCs on the local network you will not automatically see the PCs attached to the other router. But you can always connect to them by explicitly specyfing the IP. Btw, this step was added after the initial posting of this HOWTO and solves a lot of the issues people discussed later in this thread, so don't worry if you read posts in this thread about problems with communicating between PCs attached to different routers. Also note that this proxy_arp setting is not saved in the WRT54G non-volatile memory like all the other settings, so when the router is rebooted (like after a power outage), it will be cleared and you will need to repeat step 10 to set the proxy_arp back on.
Done !!! That's it !!!!
So in summary, you don't need two wrt54g routers, nor do you need WDS capable routers. A single wrt54g (with the right firmware) can operate as a "client" of any other wireless router, and create a bridge so any device connected to it will be able to access your network and the internet. The above works great for me, even with 3-4 PCs attached to the wrt54g (verified that it works).
Source: Using old router as a DIY wireless Access Point
- Old Router Settings
Now that we’ve logged into your old router, we are ready to begin changing the required settings. First up you need to disable the DHCP server, as you can see in the screenshot below. It does not matter if the DHCP server on the main router is enabled or disabled – if you want the main router to automatically assign IPs for your wireless devices on the first floor (or in range of the main router) so that you don’t need to configure them manually, then enable it.

This is where things start to become a little more difficult. Now you need to find out what IP your main router is using and to do this you’ll need to login to that router and write it down. Our D-Link main router is using the IP address of 192.168.0.1, so we set the IP address of the old router to 192.168.0.2 – this is an important step, so that both routers can talk to each other without any conflicts. Also ensure that the subnet mask on both routers is the same – as you can see from the screenshot above, both routers we used were set to the subnet of 255.255.255.0, which is the default setting.
Okay, now that your old router has its own unique IP address and you’ve disabled DHCP, we need to change some more settings...

Next up you need to disable UPnP on the old router – this option can usually be found under the admin section or advanced settings in most common routers.

Now we are going to disable the firewall of the old router since we already have a firewall in place provided by the main router. Head to the security section settings of the old router and disable it.
- Configuring Wireless Settings
Now let’s configure the all important wireless settings of the old router. We set the WRT54G to the wireless mode of “G-Only”, as this mode provides the best performance. If you set any router to mixed mode, they usually see at least a slight drop in performance, as they need to negotiate between the two modes.

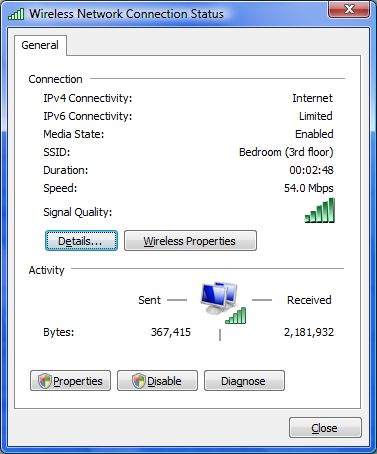
Next up we setup the SSID (or wireless network name) and we changed the name to “Bedroom (3rd floor)” so that it is easy to identify when selecting a network from the list – it doesn’t matter if you enable SSID broadcasting or not. It just means that if it is disabled, it will be hidden, and you’ll need to manually enter in the wireless connection details on your PC or network device.
Most new routers have the ability to auto scan and select the wireless channel (or frequency) which is best to use but older ones such as the WRT54G do not. For the best results, you should chose one unique channel for the main router (we used channel 6 that uses 2.437GHz) and a different channel for the old router, as you can see we used channel 11 that uses 2.462GHz.

It’s up to you whether or not you decide to enable wireless security on the old router but it is highly recommended, unless you want to share your Internet connection with all of the world and its dogs. We have found during testing that WPA2 Personal (with the AES only cipher) provides the best performance and have hence used that. For added security, use an uncommon password unrelated to you with a mixture of letters, numbers and symbols. It will be very hard to break.
- Finishing up with the old router
Now that the old router is fully setup and ready to go, run the Ethernet cable from a spare LAN port on the main router (or via a power line device) and plug the other end into one of the spare LAN ports (don’t plug into the WAN port, as it will not work) on the back of the old router and then we are ready to move onto setting up the devices connecting to the old router.
Setting up devices connecting to old router
Now we are starting to get somewhere here – your old router finally sees some life and is all setup and ready to go – well, almost.
- Connecting to the new wireless network
Let’s now try connecting to the old router that you’ve just finished setting up. Depending on where you are in your house or office, you should see at least two wireless networks that you are able to connect to, just like you can see in the screenshot above. Connect to the newly created wireless network, in our case it’s called “Bedroom (3rd floor)”.

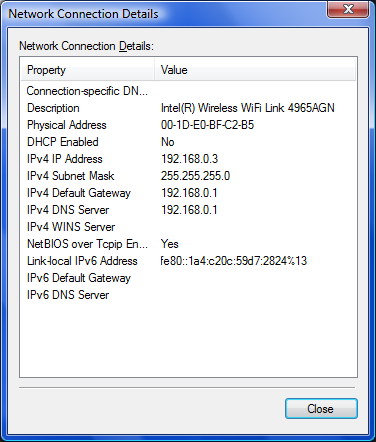
Once you first connect, nothing will happen and it will assign you an IP address of something along the lines of 169.x.x.x. You won’t be able to access the LAN or Internet yet, but don’t worry – read on.
- Setting a manual LAN IP address
What we need to do now is setup a manually configured LAN IP address, as you will remember, we disabled the DHCP server of the old router. Go to the properties of your network connection, click Properties, Internet Protocol Version 4 and then click Properties again. Now you need to select “Use the following IP address” and now you are able to enter in your manually selected IP address.
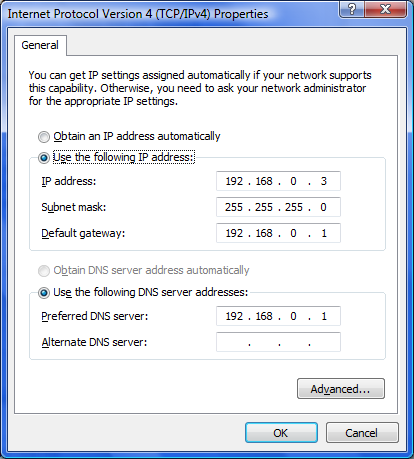
Previously in this guide you set a local IP address for your old router, we used 192.168.0.2. If this is the first device connecting to the old router, you should use an IP address of anything above that such as 192.168.0.3. Other devices wanting to connect should use 192.168.0.4, 192.168.0.5 and so on.
Listen up here... the last number cannot go above 256 OR wherever the DHCP IP range on the main router begins at. Our D-Link router begins its DHCP IP range at 192.168.0.100 to 192.168.0.199, so don’t select an IP in the range between 100 and 199, to avoid conflicts with other networked devices. Set the subnet mask as 255.255.255.0, although it should do that for you automatically, once you’ve entered in the IP.
Finally, we need to enter in the default gateway and this is the IP address that provides us with the lovely Internet access, in other words, the main router which has your modem connected to it. Here you should enter in the IP address of the main router and in our case it is 192.168.0.1. Also set the preferred DNS server to the same IP as your main router. Apply these settings and wait a few seconds for the network to initialize and then you should be connected and ready to go.
Hay presto, we’re done?!

Once we’ve finished all that, you should be able to access your network and the Internet at full speed, as if you were connected to the main router, which is normally out of range.
Brilliant - huh? We thought you would like!
Troubleshooting and Support
If you cannot use the Internet or see other computers on your network, you haven’t followed this guide properly or your old wireless router may be broken or not working, as it should. You may also have missed one or two steps that make all the difference, so go back and check again.
As a quick test, open up a command prompt by clicking start, Run and then type in “cmd”. In the command prompt, try and ping the main router by typing in “ping 192.168.0.1” (or whatever IP address your main router is set to use). If you do not get a ping response right away, it means you’ve done something wrong and you need to go back and check all the settings discussed in this guide. Also make sure that your Ethernet cables are plugged in and also in the proper spots – for instance, LAN port to LAN port from main router to the other router.
Please do not email us with questions as we do not answer over email; instead, direct your questions to our forums where our members would be more than happy to assist you!
No comments:
Post a Comment